


Arduino community has been growing since 2005. This community has created loads of sensors, modules, shield that will improve your design and projects. sensors are electronics device,they convert physical parameters to electronics signal,these sensors are selected base on their mode of connection,usage and complexity. Here are the awesome list of sensors widely used in Arduino projects and other microcontrollers.
1. MQ Series Sensors MQ135 MQ2 MQ3 MQ7 Detecting Gas Sensor Detector

This detector module utilizes an MQ series as the sensitive element and has a protection resistor and an malleable resistor on board. The MQ series gas detector is sensitive to LPG, i-butane, propane, methane, alcohol, Hydrogen and bank. It could be used in gas leakage detecting accoutrements in family and assiduity. The resistance of the sensitive element changes as the attention of the target gas changes
2. Passive Buzzer Module Alarm Sensor Beep Audion 9012 Drive 3.3-5V

The module is propelled by 9012 triode
Working Voltage3.3V-5V
set up bolt hole for easy installation
PCB size of small board2.8 cm *1.3 cm
Module Interface Description (3- line)
1 outer 3.3V-5V Voltage (can be directly connected with 5V and3.3 V MCU)
2-External GND3 out External MCU IO Port
3. PIR MOTION SENSOR
This module reserved for position, can be set to photosensitive control, strong light during the day or not induction. Photosensitive control is voluntary, the plant didn't install photosensitive resistor.

PIRs are principally made of a pyroelectric detectors, it can descry situations of infrared radiation. Everything emits some low position radiation, and the hotter commodity is, the further radiation is emitted. The detector in a stir sensor is actually resolve in two halves. The reason for that's that we're looking to descry stir ( change) not average IR situations. The two halves are wired up so that they cancel each otherout.However, the affair will swing high or low, If one half sees more or less IR radiation than the other.

Utmost PIR modules have a 3- leg connection at the side or bottom. The pinout may vary between modules so triple- check the pinout! It's frequently silkscreened on right coming to the connection. One leg will be base, another will be signal and the final bone will be power. Power is generally 3-5VDC input but may be as high as 12V. Occasionally larger modules do not have direct affair and rather just operate a relay in which case there's ground, power and the two switch connections.
4. Soil moisture sensor
The sensor also contains an electronic module that connects the probe to the Arduino.
The module produces an affair voltage according to the resistance of the inquiry and is made available at an Analog Affair leg.
The same signal is fed to a LM393 High Precision Comparator to digitize it and is made available at an Digital Affair leg.
The module has a erected-in potentiometer for perceptivity adaptation of the digital affair.

You can set a threshold by using a potentiometer; So that when the humidity position exceeds the threshold value, the module will affair LOW else HIGH.
This setup is veritably useful when you want to spark an action when certain threshold is reached. For illustration, when the humidity position in the soil crosses a threshold, you can spark a relay to start pumping water. You got the idea!
Piecemeal from this, the module has two LEDs. The Power LED will light up when the module is powered. The Status LED will light up when the digital affair goes Downward.
The soil humidity detector is super easy to use and only has 4 legs to connect. (Analog Affair) leg gives us an analog signal between the force value to 0V and will be connected to one of the analog inputs on your Arduino. (Digital Affair) leg gives Digital affair of internal comparator circuit. You can connect it to any digital leg on an Arduino or directly to a 5V relay or analogous device.
VCC leg inventories power for the detector. It's recommended to power the detector with between3.3 V – 5V. Please note that the analog affair will vary depending on what voltage is handed for the detector.
GND is a ground connection.
5. ultrasonic sensor

The ultrasonic sensor (or transducer) works on the same principles as a radar system. An ultrasonic sensor can convert electrical energy into aural swells and vice versa. The aural surge signal is an ultrasonic surge traveling at a frequency above 18kHz. The notorious HC SR04 ultrasonic sensor generates ultrasonic swells at 40kHz frequency.
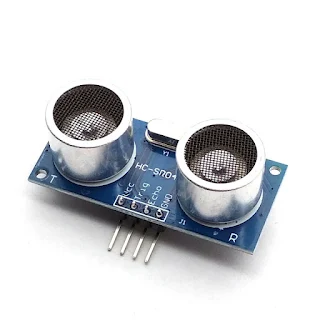
Generally, a microcontroller is used for communication with an ultrasonic sensor. To begin measuring the distance, the microcontroller sends a sensor signal to the ultrasonic sensor. The duty cycle of this sensor signal is 10µS for the HC-SR04 ultrasonic sensor. When started, the ultrasonic sensor generates eight aural (ultrasonic) surge bursts and initiates a time counter. As soon as the reflected ( echo) signal is entered, the timekeeper stops. The affair of the ultrasonic sensor is a high palpitation with the same duration as the time difference between transmitted ultrasonic bursts and the entered echo signal.
6. LM35 temperature sensor
LM35 is a temperature sensor that labors an analog signal which is commensurable to the immediate temperature. The affair voltage can fluently be interpreted to gain a temperature reading in Celsius. The advantage of lm35 over thermistor is it doesn't bear any external estimation. The coating also protects it from tone-heating. it has lesser delicacy, this is what makes it popular among potterers, DIY circuit makers, and scholars.

In order to understand the working principle of LM35 temperature detector we've to understand the direct scale factor. In the features of LM35 it's given to be 10 manufactories volt per degree centigrade. It means that with increase in affair of 10 manufactories volt by the detector vout leg the temperature value increases by one. For illustration, if the detector is outputting 100 manufactories volt at vout leg the temperature in centigrade will be 10- degree centigrade. The same goes for the negative temperature reading. If the detector is outputting-100 manufactories volt the temperature will be-10 degrees Celsius.
7. Sound sensor
The sound detector is a small board that combines a microphone (50Hz-10kHz) and some processing circuitry to convert sound swells into electrical signals.
This electrical signal is fed to on- board LM393 High Precision Comparator to digitize it and is made available at OUT leg.

The module has a erected-in potentiometer for perceptivity adaptation of the OUT signal.
You can set a threshold by using a potentiometer; So that when the breadth of the sound exceeds the threshold value, the module will affair LOW else HIGH.
This setup is veritably useful when you want to spark an action when certain threshold is reached. For illustration, when the breadth of the sound crosses a threshold (when a knock is detected), you can spark a relay to control the light.
Piecemeal from this, the module has two LEDs. The Power LED will light up when the module is powered. The Status LED will light up when the digital affair goes Downward. It comes with three legs.
VCC leg inventories power for the detector. It's recommended to power the detector with between3.3 V – 5V, GND is a groundconnection.OUT leg labors HIGH when conditions are quiet and goes Downward when sound is detected. You can connect it to any digital leg on an Arduino or directly to a 5V relay or analogous device.
8. Photo-resistor sensor

LDR Sensor module is used to descry the intensity of light. It's associated with both analog affair leg and digital affair leg labelled as AO and DO independently on the board. When there's light, the resistance of LDR will come low according to the intensity of light. The lesser the intensity of light, the lower the resistance of LDR. The detector has a potentiometer clump that can be acclimated to change the perceptivity of LDR towards light.
9. rain sensor
A rain sensor is one kind of low- cost electronic detector which is used to descry the downfall or water drops. It works as a switch. Typically the switch is open condition. This detector is consists of substantially two corridor, one is Seeing Pad and another bone is the Sensor Module. When downfall or water drops fall on the Seeing Pad face, also the switch will be closed. The Sensor Module reads data from the detector pad and processes the data and converts it into a digital/ analog affair. So, the detector can give both types of affair Digital affair and Analog affair.

At first, we need to connect the Seeing Pad to the Sensor Module through the muumuu line. Now we can connect the rain detector module’s Vcc & Gnd leg to 5v power force. Also set the threshold voltage at the Non-Inverting input three of the IC in dry condition of the seeing pad by rotating the potentiometer clump to set the perceptivity of the detector.
When water drops increase on the seeing pad face also its conductivity will increase and also resistance will drop. Also a Low quantum of voltage from the seeing pad is given to the Flipping input two of the IC. Also the LM393 IC compares this voltage with the threshold voltage. In this condition, this input voltage is lower than the threshold voltage, so the detector affair goes LOW.
When no water drops fall on the seeing pad face also it has low conductivity and high resistance. Also the high quantum of voltage will be allocated across the seeing pad. So, a High quantum of voltage from the seeing pad is given to the Flipping input two of the IC. Again the LM393 IC compares this voltage with the threshold voltage. In this condition, this input voltage is lesser than the threshold voltage, so the detector module affair goes High.
10. water level sensor
Liquid Position discovery or in other words, measuring the position of liquid in deep tanks or water in budgets is done in order to control the depth of water and help it from the overflow in assiduity. In ménage operations also it can be used for illustration to descry the water position inside fences. The purpose of the position dimension is to determine the position of liquid at any moment and do the required operation consequently. There are different ways to measure the liquid position. Some detectors calculate the depth of liquid according to the pressure caused by the liquid’s specific graveness and the perpendicular distance to the face. Some others emit ultrasonic swells from a transduc

er which also detects and measures the reflected swells to calculate the liquid depth. The detector that we use in this tutorial is Arduino compatible and works on the base of resistance measures, you ’ll soon find out how it works.

This module, which is one of the most extensively used modules for detecting the liquid position, works on the base of resistance change. On this module, there are resemblant lines of conductivity that are connected to the Ground and are in fact the path of electric current. Water is a good captain so when these lines are in the water, they will be short circuit, and the resistance of the module decreases.
By fixing the module on the liquid vessel, the variable resistance sets on a specific value grounded on the water position. The module measures this analog resistor and sends it to Arduino. Arduino uses this value directly or by converting this value to a digital quantum.
This water position detector has 3 Legs. 2 of them are for power (), connecting to the 5V, and ground (-), connecting to the ground outstation of the Arduino. The other leg (S), is the analog affair leg.
Thanks for reading our airticle, drop your comment,this will help us in improving our airticle.
Related Topics
Everything you need to know about Arduino (free course!!)
Top 4 reasons why you must learn how to use Arduino.
(Level-1) Crazy About Arduino: Your End-To- End Workshop – Level 1 (Free!!! Course)
Start building up your career in embedded systems using Arduino board, this course is free!!
Top 5 Electronics Projects For Beginners (part 1)
Top 3 Simple Electronics Projects for Beginners (the final part).
0 Comments